$0.00
This article is from WOOD Magazine
(www.woodmagazine.com)  ---
The rich contours of natural wood edges give tables, benches, and other projects a sculptural quality, almost as much art as furniture. Thankfully, anyone can build such stunning projects because doing so requires only basic techniques and tools.
Another great thing about building these types of organic projects: There’s really no right or wrong way to do it. No two slabs will be exactly alike, making each project unique. Simply let the natural shapes, and the tips here, lead you through design and building.
Tips for sawing your own natural-edge slabs
What to look for
•Logs felled during spring and summer give up their bark easier once dry, and have more unusual coloring due to higher moisture content.
•Search out logs with multiple knots, burls, limbs, and other unique characteristics.
•To create even more character in your wood, allow the logs to lie on the ground or in a stack for a year or two uncovered. Exposure to weather increases the chances of getting spalted streaks and color variations. (Cherry, soft maple, birch, box elder, and most softwoods break down quicker, so limit their exposure to a year.)
Cutting the logs
•Bark contains grit that dulls blades quickly, so remove as much as possible before firing up the mill. Start with a sharp blade, and keep extras on hand.
•Cut slabs a minimum of 2″ thick to minimize warping. Saw thicker slabs for specific purposes or projects. If you want to use the warp-prone pith (the log’s center), cut it as a 4–5″-thick slab, as shown at right. If the slab warps or splits later, remove the pith and make two slabs with single natural edges—great for shelves and mantels—or glue them together to form a wider slab with two natural edges.
Drying the slabs
•Air-drying maintains the best color of your wood; kiln-drying, although quicker, tends to even out subtle differences in wood tones.
•After cutting, don’t leave the slabs stacked for more than a day or two without stickering (adding spacers to promote air circulation).
•Place slow-drying thicker slabs at the bottom of the stack so down the road you can access the thinner, drier slabs without dismantling the whole stack.


First, grab a slab
You can obtain slabs in several ways; here’s a list, beginning with your most affordable options:
•Saw ’em yourself. For details on this rewarding but labor-intensive option, see “Tips for sawing your own natural-edge slabs” listed above.
•Have a local mill saw ’em for you. A lot of sawyers won’t mind a custom-cutting job. Just bring them your log or have a mobile mill come to you. (For operators of Wood-Mizer brand portable bandsaw mills in your area, call 800-553-0182; or go to forestryforum.com to locate a local sawyer.) Just remember, you’ll need to air-dry the slabs about one year per inch of thickness or have them kiln-dried.
•Buy ’em cut and dried. You might be hard-pressed to find a local retailer selling slabs with two natural edges, so look to the Internet. In Sources, at the bottom of the story, you’ll find sites selling natural-edge slabs, even in table-size planks; exotic wood species; and highly figured grain patterns, such as burls. When your wood arrives, let it acclimate to your shop’s humidity for a week or two before doing any machining.
Let the slab drive the design
With the slab in hand, you probably have a general idea of what you want to build (large table, small table, long bench, short bench, for example). Now consider the following in order to match the unique characteristics of the slab to your personal tastes:
•The face of a table, bench, or headboard might look good with a little waviness; but a desktop must be flat. (We’ll show you how to flatten a slab later in this article.)
•Unless you’re working with a full cross-section burl, most slabs will have been cut off at the ends by a chainsaw. Those ends usually look best when sawn smooth and perpendicular to the face. If you want to sculpt the ends similar to the natural edges, use carving tools or an angle grinder (using coarse, beveled abrasive wheels) followed by sanding flap wheels.
•Determine parts that must be certain dimensions—such as table height or seat width—and design the other parts in proportion to those dimensions. For example, on the coffee-table above, we had to cut down the 51⁄2 ‘-long slab to 4’ to make it proportional to the natural shape and dimensions of our apple base.

Time to remove the bark
Even though you might like the look of the bark, it tends to fall off later. Besides, there could be eye-catching surprises lurking below the bark, such as the worm tracks shown at top right. Begin by removing a 6–8″ section of bark, starting at an end. The cambium layer, the fibrous “glue” that connects the bark to the wood, can add depth and character to the edge if you leave it. (It won’t come loose later.) Scraping away that layer creates a slippery-smooth edge with more rounded features.
You don’t need to sand the edges smooth at this point. And if you leave the cambium, you’ll do little to no sanding to maintain the texture.


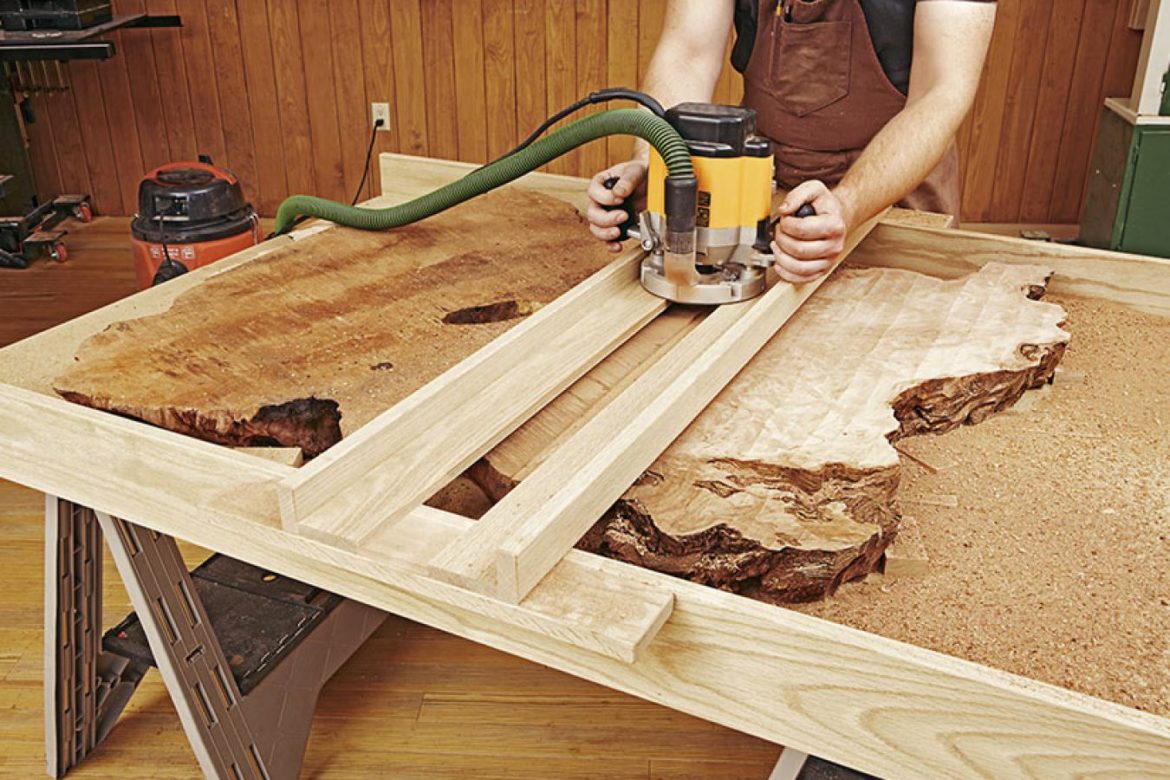
Flatten the slab faces
If you bought the slab precut, it might come with the faces already planed or sanded. Otherwise, flatten both faces with a plunge router and jig. Begin by building the jig below, sized to fit your slab. We built ours 42″ wide to accommodate a redwood burl, as well as most future slabs.

Cut natural-edge project parts to rough finished length so you’re not flattening more stock than necessary. With the jig resting on sawhorses, place the slab where it will be easiest for you to reach with the router. Level the slab with wedges and “trap” it with screw-on cleats, as shown above.
Install a wide, flat-cutting bit, such as Freud’s 11⁄2 “-wide mortising bit (#16-128), in your router. With the router resting on the carriage, find the highest spot on the slab and set the cutting depth to remove 1⁄8 ” at that spot. Now plunge and rout across the slab, alternately holding the router against the carriage sides. Slide the carriage along the rails and repeat the length of the slab. Continue in 1⁄8 “-deeper increments until flat.
Turn the slab over, secure it with the cleats—no wedges this time—and flatten the other face as you did the first. Leave the slab as thick as possible to prevent warping. Power-sand both faces with 60- or 80-grit abrasive until the router marks disappear, but don’t finish-sand yet.
Focus on the flaws
Now you begin to see what the slab will look like when finished. Evaluate it for splits or other defects and decide how you want to treat them. Because splits could continue to open up, deal with them first to stabilize the slab, using butterfly keys as shown below.


Space keys along the crack’s length in proportion to the slab size. Install keys on both faces to further protect against future splits; they don’t need to align with each other. Typically, make your keys from 1⁄2 “-thick stock—we like species that contrast with the slab, but there’s no right or wrong choice. Rout mortises and glue them in place with two-part epoxy, which fills in tiny voids better than yellow glue.
Next, clean out loose bark inclusions (small pockets of bark within the wood’s interior) and either fill them with epoxy (colored or clear, but avoid epoxy that dries to a milky color) or leave them empty. Tight bark inclusions will likely remain intact. Glue torn or loose fibers or splinters back in place and sand the repair to blend in.
Now for the joinery
To connect the slab to its base, we recommend figure-8 fasteners, shown below, over integral joinery (mortise and tenon or dovetails, for example) because they’re easy to install, they allow the wood to shrink and expand without splitting, and they work with almost any project. They also allow you to apply finish to all or most project parts before assembling. You should make shallow mortises (the thickness of the fasteners) in either the slab or the base so the fasteners sit flush with that piece. (Use longer screws than those that come with the fasteners—ideally, you want to use at least 1″-long screws.) If you prefer to cut integral joints, such as mortises-and-tenons or dovetails, be sure to allow for seasonal wood movement.

Sanding and finishing
Before assembly, ease sharp edges with a rasp, file, or sandpaper. Hand-plane or sand smooth the slab’s top face; if sanding only, start with 120 grit and continue with 150, 180, 220, and 320, if needed. Sand the natural edges with 120, 180, and 220-grit flap wheels until you’re satisfied.
Apply your finish of choice. We like clear-oil finishes because they accentuate the wood’s figure and grain. Follow up with several protective top coats of polyurethane, lacquer, or shellac.
Sources
Natural-edge wood slabs:
•Berkshire Products, Massachusetts, (domestic, exotic, and figured species), 413-229-7919,
berkshireproducts.com.
•Hearne Hardwoods, Pennsylvania, (domestic and exotic species), 888-814-0007, hearnehardwoods.com.
•Ohio Woodlands, Ohio, (primarily domestic species),
330-506-9012, ohiowoodlands.com.
•Primo Wood Slabs, Tennessee, (primarily domestic
species), 423-272-6003, primowoodslabs.com.
•Redwood.burl.com, California, (redwood slabs and burls), 707-826-9663, redwoodburl.com.
Sanding flap wheels:
•Klingspor’s Woodworking Shop, 800-228-0000,
woodworkingshop.com.
•Lee Valley, 800-871-8158, leevalley.com.
•Dremel, 800-437-3635, dremel.com.
Figure-8 fasteners:
•Part #21650, Rockler Woodworking &
Hardware, 800-279-4441, rockler. com.
Freud mortising router bit (#16-128):
•Part #837557, Woodcraft, 800-225-1153,
woodcraft.com.
