$0.00
SOURCING MATERIALS FOR A LIVE EDGE COFFEE TABLE
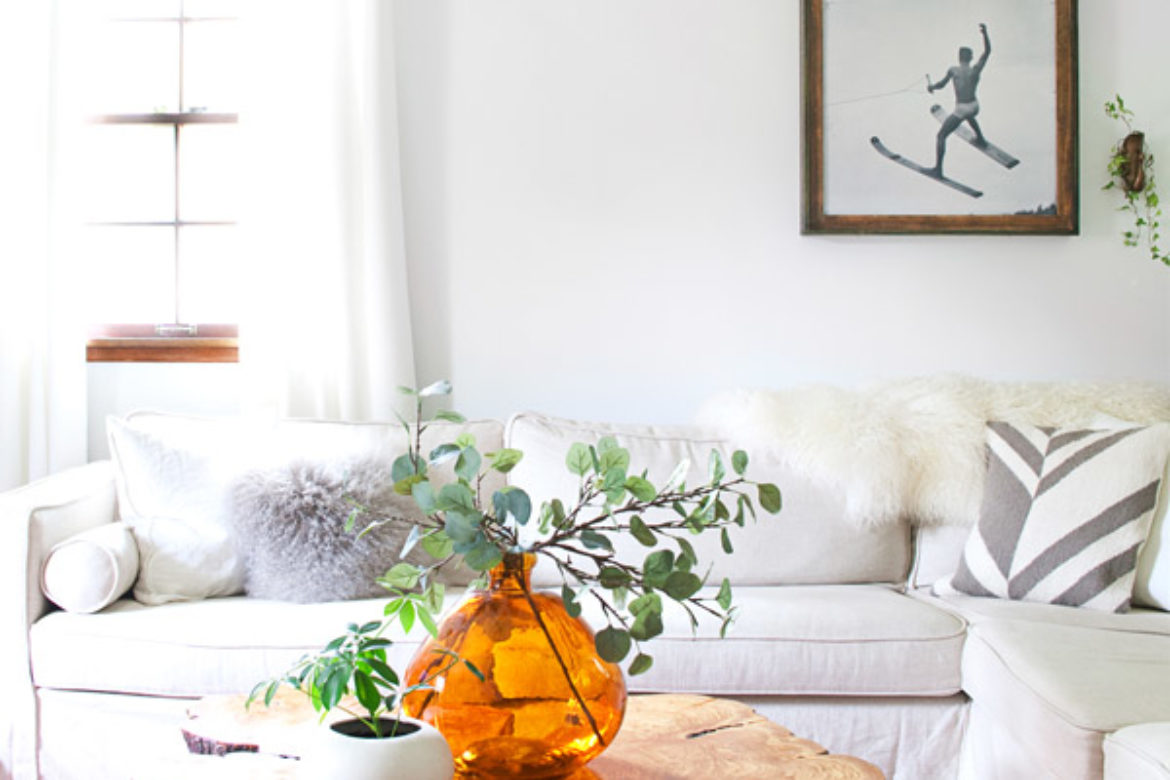
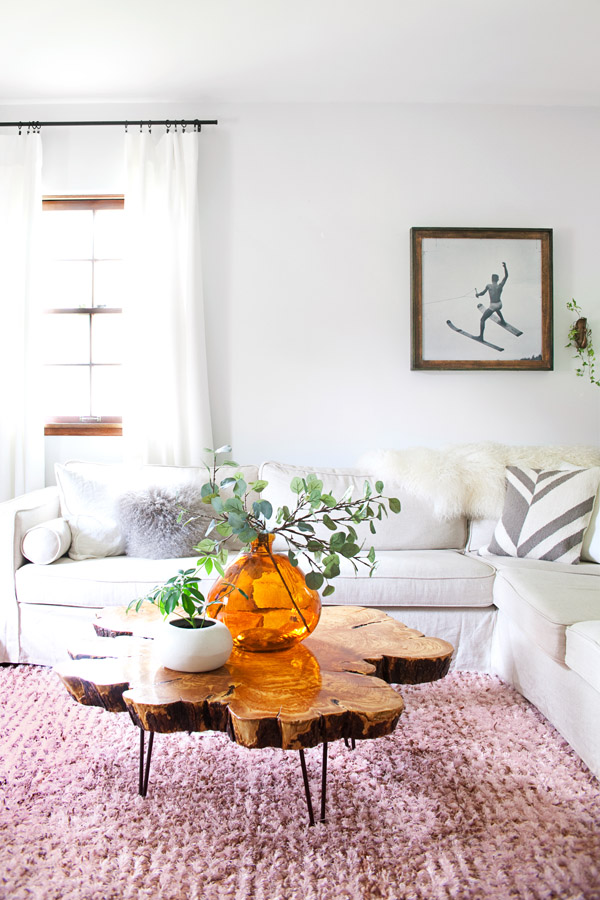
— I’m a little worried my coffee table is getting too big for its britches. Every time family or friends come over, they fawn over its beauty. I’m sure my loving gazes aren’t helping matters. It’s even become difficult for me to enjoy my favorite TV shows because I find myself just watching the table, as if it’s about to do a new trick. Nah, it’s just sitting there looking like my dreams come true!
Last Spring, Elsie and I were talking about styles of coffee tables that would look nice in her living room. We both loved the idea of a live edge table, but we quickly discovered nice looking ones were shockingly expensive. We’re talking over $1K. Yikes! But the more I looked, the more I fell in love with the idea myself. Finally I decided I would DIY a live-edge coffee table if it was the last thing I did! Give me tree rounds or give me death!
This entire project cost me about $215, which shocks me now even as I type this. If you’d like to make your own, I have some tips for you! But you might want to start praying or crossing your fingers now for a little bit of extra luck.
Planning Your Coffee Table
The first thing to do when planning your live edge coffee table is to decide on what size and shape you’d like. I selected a relatively round shape because I had a large space to fill in the “L” of my sectional sofa. If I had a long, straight sofa, I may have chosen a longer, rectangular shaped piece of wood.
Be sure to carefully consider the size of your coffee table too! Live edge tables may appear heftier than you expect, dwarfing your sofa in comparison. So if you’re uncertain about the size, I’d err on the smaller side. Also keep in mind the thickness of the lumber you’d like. I was sure I wanted a slab of lumber that was thicker than the 2-3″ inches that is more commonly found from live-edge lumber dealers. Because of the thicker slab, I had to get shorter legs to keep my coffee table around the height of my sofa. (It’s actually a couple of inches shorter than our sofa, which is ideal! We can still put our feet up.)
Live-Edge Lumber Terminology
It’s important to know what kind of lumber you want before you begin sourcing the lumber.
1. Burl Round—The rarest type of tree slice is burl, and it is difficult to get in large slices. Burl is cut from protrusions in the tree trunk—you know, the warty looking guys. These slices will have striking patterns through the grain rather than the even rings you see in tree rounds. Because they’re anomalies and not a predictable part of the tree growth, burl is typically very expensive and used for veneer and fine woodworking. You may be able to work with a tree removal service to snatch up the burl from trees they’ve felled.
2. Tree Round—A tree round is just a horizontally sawn slice of wood which shows the rings of the tree and has a relatively round shape. The actual shape of a tree round will vary depending on the species as well as the individual tree. The base of a tree, near the trunk, will yield a more irregular shape of tree round. The higher up the tree is cut, however, the more uniform the border will be.
3. Tree Slab—A tree slab is a long slice of a log that includes the tree’s raw edge. It is cut along the length of the tree rather than across its width. This is a good choice for a table you’d like to fill a longer space. The downside to long tree slabs is that the cut edges on either end of the lumber will not have a live edge. This may or may not be important to you.
Sourcing Live-Edge Tabletop Lumber
The most time consuming and frustrating part of this whole project is definitely sourcing the lumber for the tabletop. I spent many a late night searching local Craigslist ads as well as listings in nearby states. I scoured Etsy and eBay, and I considered how much money I was willing to spend to get the tabletop I wanted. For a while I was thinking that $300 would be the best price I could get on an oval slab about 16″x24″ in size. The slab wasn’t finished, and was only 2″ thick. Not my ideal, and actually more than I was hoping to pay.
Then one night I found a local listing for this thick slab of curly ash, and my heart started pounding out of my chest. This was the one! It was already finished and only $175! And, it was 3’x3′, which was an ideal size for the space I wanted to fill. I emailed the seller right then at three o’clock in the morning, and then every day until the poor guy finally responded! I drove out to pick it up within hours and couldn’t believe my luck. It was beautiful, and just what I had been hoping for.
My best advice for sourcing lumber is to keep checking Craigslist for “live edge,” “tree slice,” “tree round,” “natural table,” and “tree removal service.” If you don’t have any luck finding ready-made slices, try calling tree removal services to see if you can either pick up lumber from one of their job sites, or maybe they can even work with you to cut a slice that suits your specifications. Make sure you have a vehicle big enough and someone strong enough to help. These big guys are no joke!
Finishing the Tabletop Lumber
Curing the Lumber—If your lumber is freshly cut, you will need to have it kiln dried before sealing it. If you don’t dry it, it will shrink over time and the finish will crack and chip. You can contact a lumber mill for kiln drying services. Kiln drying will cause the lumber to split open in one spot, as you can see in my coffee table. Some expert craftsmen will saw the round in half, and then join it again after drying to avoid this issue while others choose to let the wood dry naturally over years so no splitting will occur.
Filling Holes and Gaps—If there are large holes or gaps in the wood that you worry about (I’m thinking of food and stuff that little kiddos stuff into these things!), you may wish to fill them by pouring epoxy into the cavities. If the hole goes all the way through the wood, cover the bottom of the hole with duct tape before pouring the epoxy.
Smoothing the Edges—If you don’t like the look of bark, use a wood chisel to remove it from the edges of your lumber. Then sand it down to smooth the surface. If the surface of your table is roughly sawn, you may wish to have a lumber mill sand it down with an industrial drum sander or you may wish for them to plane it for you. If it’s not too rough, you can sand it yourself with a belt sander or rotary sander and lots of sandpaper.
Sealing the Wood—I purchased my lumber already sealed with a high gloss polyurethane, though I would have preferred a satin finish. From what I’ve read, brush-on polyurethane seems to be the finish of choice for these types of tables, though tung oil or wax would be alternative sealing methods that would require maintenance over time to keep up the waterproof seal. If you want a lighter finish on your table, keep in mind that sealing the raw lumber will generally darken it and bring out the grain, depending on your sealing method. Also, remember that wood naturally darkens over time. To lighten the table, consider pickling or white washing the lumber before sealing it.
Selecting a Table Base
There are a lot of options for pre-made and custom-made coffee table bases, which means your only limit is your budget. I chose hairpin legs for my table because I already had a set on hand. Who knows what I would’ve chosen otherwise. I do really like #5 above for a more oval or rectangular-shaped tabletop.
1. Hairpin Legs: These are very easily found online these days. Here is a set of four on Etsy that sells for less than $40.
2. Tulip Base: Finding these vintage bases is hit or miss but worth a shot! Here is one on Etsy currently for $129.
3. X-Frame: This is a great modern design that works with many styles. This one goes for around $100 on Etsy.
4. Cafe-Style Pedestal: These are easy to find and work well with smaller slabs, though short ones are tricky to find. Here is one for $35.
5. Industrial Metal Legs: I love this simple, industrial style of this pair of legs that I found for $68 on Etsy.
6. Steel Spider Base: This is a great masculine style for those who enjoy the industrial modern look. It sells for around $160 here on Etsy.
Because I had purchased my slab already finished, all I needed to do was attach the legs! I actually had two sets of hairpin table legs from an old coffee table (the top of which I sold recently to partially fund this project), so all I had to do was walk into the garage, dust off the legs, and grab some heavy-duty screws from my workbench.
The trickiest part was deciding on the placement of the legs. Should they form a rectangle? Should I just place them pointed outward at the widest parts of the table and not worry about symmetry or visual balance? I decided to place them in a rectangle and tried to situate the rectangle as centered as possible on the irregularly shaped table.
Hairpin Leg Tip: Use the longest screws that your tabletop thickness allows. Stainless steel screws are the best! If you don’t use long, strong screws, the legs will begin to pull away if you drag the table. Use a long driver to reach the screw heads easily when driving them in.
This live-edge table is something I’m pretty proud of, even though the most work I did was scrolling through Craigslist ads on my phone. My poor thumbs! But I really love how well it compliments everything else in our living room, adding an organic shape and bohemian vibe to the other straight-laced furnishings around it. And any time I can make something for less than selling price, I think I’ve accomplished something to be proud of. Can I get a what what?! –Mandi
Credits // Author and Photography: Mandi Johnson. Photos edited with A Beautiful Mess actions.